


How to Remove a DTF Transfer from a Shirt (Without Wrecking It)
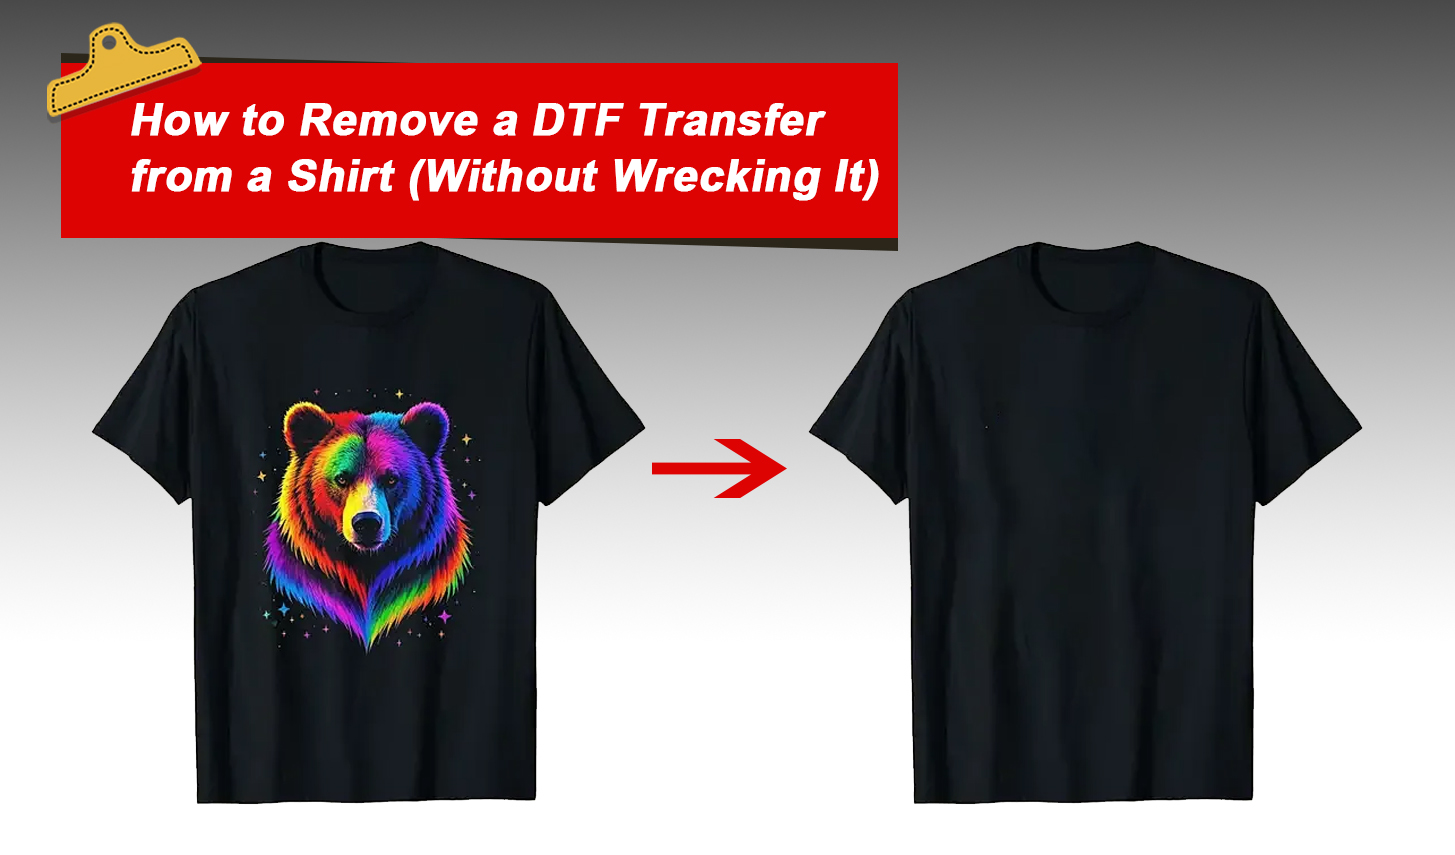
We've removed DTF transfers from well over 1,000 shirts—cotton, poly, tri-blends, you name it.
Whether you're fixing a misaligned DTF print, dealing with leftover adhesive, or troubleshooting a bad transfer application, this guide breaks down exactly how to remove a DTF transfer cleanly and without damaging the fabric.
Method 1: Heat and Peel (Most Reliable)
This is the method we use the most—and for good reason. If you catch the DTF print early (within a few days of pressing), heat and peel is fast, safe, and effective.
It works exceptionally well when the adhesive hasn't yet fully cured into the fabric. No harsh chemicals, no damage—just controlled heat and the right tools.
What You Need:
- Heat press or iron
- Parchment paper or Teflon sheet
- Plastic scraper or old gift card
- Rubbing alcohol or VLR (vinyl letter remover)
- Microfiber or cotton cloth
How to Do It:
Step #1: Heat It Up
Set your heat press to 320–340°F (160–170°C). Using an iron? Crank it to the highest setting—no steam. Cover the print with parchment or a Teflon sheet and press for 10–15 seconds.
Step #2: Start the Peel
While it's still warm, lift one corner of the transfer using your fingers or a scraper. Slowly peel it away. If it fights back, apply heat again and go slowly.
Step #3: Remove Leftover Adhesive
Moisten a clean cloth with rubbing alcohol or VLR and gently rub the adhesive residue in a circular motion. Use just enough pressure to wipe away the residue without being too rough on the fabric.
Step #4: Final Wash
To clear solvent residue and refresh the fabric, run the garment through a cold cycle.
When the adhesive hasn't completely set into the fibres or for recent transfers, this approach performs well. We make daily use of it.
Method 2: Chemical Solvent (When Heat Isn't Enough)
If you're trying to remove a DTF transfer that has already been heat-cured or washed multiple times, chemical removal is your best option.
What You Need:
- Acetone, rubbing alcohol, or VLR
- Soft cloth or cotton pads
- Plastic scraper
- Cold water
How to Do It:
Step #1: Patch Test First
Always test your solvent on a hidden area. Some dyes or fabrics react badly, especially dark colors and synthetics.
Step #2: Apply the Solvent
Apply the solvent gently to the DTF print and let it sit for three to five minutes to allow the glue or adhesive to absorb it. To prevent possible fabric damage, ensure the area is damp but not oversaturated.
Step #3: Scrape Carefully
Once the glue or adhesive has softened, use a plastic scraper to lift it off gently. If parts are still stuck, touch them up with more solvent and keep working slowly.
Step #4: Rinse and Wash
To remove any remaining solvent, rinse the area with cold water, then wash the shirt as you normally would.
This works great for older transfers or thicker designs. We've salvaged dozens of "ruined" orders this way.
Method 3: Freeze and Crack (Old-School Hack)
Trying to learn how to remove a DTF transfer with no heat press or chemicals on hand? Freezing can help in a pinch.
What You Need:
- Freezer
- Plastic bag
- Scraper
How to Do It:
Step #1: Freeze the Shirt
Put the shirt in a sealed bag and freeze it for 4 to 6 hours—this will make the DTF film stiff and easier to break.
Step #2: Crack and Chip
Bend the shirt sharply at the print. You'll hear the transfer cracking. Use a scraper to chip away the broken bits.
Step #3: Tidy Up
Wipe with rubbing alcohol and wash to remove fragments and residue.
It's not perfect, but it's helped us save shirts during travel gigs and vendor emergencies when no gear was around.
Pro Tips From the Trenches
After removing DTF transfers from thousands of garments, here's what we've learned:
- Use VLR over acetone for reduced odor and improved fabric safety. VLR was designed explicitly for this purpose.
- Scrapers matter—cheap plastic tools scratch less and grip better than metal ones.
- Don't rush it. When you rush, you tear fabric or leave visible damage.
- Rinse everything. Solvents leave chemical residue behind. Always wash afterward.
- Tight weaves are tougher. DTF sinks deeper into polyester and performance blends, making removal more challenging.
We even keep a separate heat press solely for clean-up work, as we deal with this task so frequently.
What Not to Use
People on forums love to suggest all kinds of DIY hacks—many of which are terrible ideas. Avoid these:
- Nail polish remover – It's acetone-based, but it contains oils and dyes that can stain fabric.
- Bleach – Will damage the print AND the shirt.
- Boiling water – It doesn't melt the adhesive, but it will absolutely shrink or warp your shirt.
- Hair straighteners or clothes steamers – Not enough direct heat or pressure.
Stick to what works. We've tested all the weird TikTok hacks so you don't have to.
Still Not Sure?
If you're unsure which method to use, here's how we choose:
- New print, soft fabric: Go with heat and peel.
- Old, cured print: Use chemical solvent.
- No tools available? Go with the freeze-and-crack method.
- Rush job or large order: Don't waste time. Reprint and keep things moving.
And if you're producing high volumes, keep a VLR and a heat press handy. You'll thank yourself later.
Frequently Asked Questions
- Can you remove a DTF print without damage?
Yes—we've removed DTF prints from thousands of shirts. As long as you take your time, use the right tools, and avoid rushing the process, the fabric remains intact. - What's the safest product to use?
VLR. It's designed for vinyl and film removal and is much safer than acetone from hardware stores. But always patch-test anyway. - How long does it take?
Anywhere from 15 minutes to an hour, depending on fabric, design size, and method used. - Can I remove DTF from any type of fabric?
Most fabrics, yes—especially cotton, polyester, poly blends, and canvas. Delicate items, such as silk or rayon, require extra care, and sometimes it's not worth the risk. - Should I reprint in the same area?
Only if the surface is immaculate will any leftover adhesive mess with heat transfer or ink adhesion. - What if the print won't come off?
Reapply heat or solvent. Don't force it. Stubborn transfers usually give in after 2–3 rounds. And yes, we've had designs that needed four. - Can I use a hair dryer instead of a heat press?
No. It won't get hot enough to soften the adhesive effectively.
Final Word
We've cleaned up DTF mistakes on more garments than we can count. Whether it's a last-minute order or a print gone wrong, you don't have to toss the shirt. Stick to heat, solvent, and patience—and always test before you dive in.
For a deeper dive into where DTF printing is headed and how to stay ahead, check out our guide on the future of DTF Printing in 2025.